First, the simple bit: If you don't have a digital camera, or at least a camera on your mobile phone, flickr isn't for you. Move along. I'll have something for you next time, when I look at Skype.
What Flickr Is Good For
Before I get into the specifics on how to use the features of Flickr, I'll give you an overview of why you would want to use it.
At the most basic level, Flickr is useful for storing and organizing your digital photos. If you upload your pictures to Flickr, you won't lose all of those memories when (not if) your hard disk crashes, your computer dies or you get burgled. It also makes it very easy to write blog posts about photographs and share them with your family and friends by sending around Web addresses instead of attachments.
At a more advanced level, Flickr helps you find photos again by organizing them with key words, known as tags. When you upload a photo, you attach a series of tags, as many as you can come up with, but at least a few. A good rule of thumb is to start broad and get more specific. For example:
london garden barbecue family sullivan eamonn
Each tag is like attaching the photo to a piece of string. (I struggled to come up with a better metaphor and failed. This will have to do.) Years later, when all of your photos are sitting in a virtual chaotic pile, you'll be able to pull on the "london" tag or "barbecue" tag and retrieve all of the photos taken in London or at a barbecue. My tags are here.
Go look. I'll wait. Hit the Back button in your browser to return to this article.
Notice that Flickr indicates how many pictures are under a given tag by the size of the word. "Family" is bigger than "eamonn" because there are more photographs with the former tag than the latter. Clicking on any of the tags will display only those photos with that tag. As long as I'm diligent about tagging, I'll be able to pull up all photos of our dog Dude, even years later, without having to remember when I took the pictures. There are also other ways to view your photos -- one way (using Flickr's Organizer) is to view them by date taken, since your camera (as long as you set the date and time correctly) automatically records that information for you.
Tagging is a powerful concept and is all the rage right now on the Internet. You see it in sites such as Technorati and del.icio.us. For example, I organize my Web bookmarks that way, here. It'll take a little while to get the hang of them, but it's worth the effort to try.
Public or Private?
By default, photos uploaded to Flickr are public, meaning anyone can see them. For a snapshot of what people are uploading right now, take a look here.
Again, go. I'll wait. Just hit the back arrow on your browser a few times until you return to this article. It's worth it, really. When I checked while writing this there were pictures of a wedding in Spain, the great Pyramids of Egypt and a new mom in Brazil with her baby, named Aidan.
You don't have to make your pictures public. There's a spectrum of choices. You can make any photo private, meaning only you can see them. You can also make photos viewable by only family or by family and friends. My basic strategy is to leave photos public if they just feature the family (as long as we aren't in a bathing suit or less). I make them viewable by family or friends if the shots include people outside of the immediate family and I don't have their permission. I mark photos as private if I'm only uploading them so that I can use them on my blog site or for some other utilitarian purpose.
Flickr is a social service. Your public photos get viewed and commented upon. People also form groups and pool their photos under various subjects. Participate only if you want to, but I find it fun. I get comments on my photos from people ranging from Norwegian teenagers to a father of two nearby who I've never met in person. If I post a photo of a flower or an insect that I can't identify, people will often identify it for me. In essence, the world helps me organize my pictures.
Pay or Free?
Flickr has two levels of service -- a free service that limits the number of photos you can upload each month and the size of individual shots, and a pay service that lifts both restrictions. The limits on the free account are generous, so as a new user you aren't likely to notice them. Stick with the free account for a while and see how you like it. I have a paid account because I want to keep copies of my photos at full resolution. The cost is about $25 a year, which isn't bad. If you are interested, I have a free "pro" (i.e., paid) account available to give away until July 14. Just drop me an email if you're interested (family members only please).
Step by Step
I'm not going to go too deeply into the sign-up process. It's no different than what you did for blogger and bloglines. Just go to http://www.flickr.com and click on the big, pink
 button, to the right. You'll have to come up with a screen name (a nickname, your own real name, whatever), type in your email address and come up with a password. Check the box that says you're at least 13 and have read the terms of use. Click the "Sign Up" button and you're done. That's it.
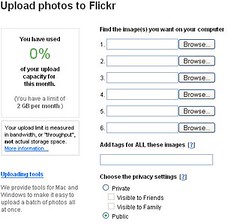
To upload photos, click on the Upload link on your new page and you'll see a screen like this:

- Click on the Browse button to find the photo you want to upload on your computer, then click Open.
- If your upload a few photos, there are probably some tags that will work for all them, add them in the space provided, just below the list of files.
- Now choose whether to make the photos public, or private. And, if private, you can make them viewable by family, friends or both.
- Click on upload.
- After they've uploaded (which can take a while), you'll be presented with a screen of the images. Here you can change the titles, write captions or add tags.
- Click Save.
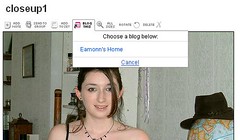
Another task you're going to want to do at some point is to blog about one of the photos you've uploaded. To do that click on the link at the top right of the screen, called "Your Account." Then scroll down a little bit and click "Your Blogs."
If you followed my last how-to, you'll have created a blog on Google's blogger. So choose "blogger" at the first step, which should look like this:

The next step is to give the username and password you use to get into your blogger account. If you leave the password blank, that's fine. You'll just be prompted for your password each time you post.

Once finished, you'll be able to click on the "Blog This" button above any of your photos, choose the blog you set up, type some words, and post.

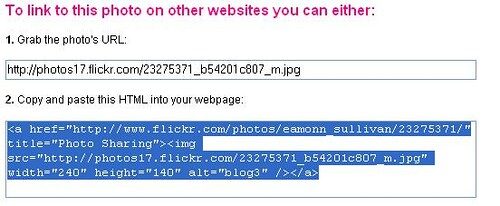
If you want to send a photo in email or post more than one photo in a blog entry, Flickr provides the address or the HTML (HyperText Markup Language -- the language used to write Web pages) that you'll need.
- Click on a photo that you have uploaded to Flickr.
- Click on "All Sizes" (it's one of the choices along the top of the photo).
- Choose the size that you want to send or copy onto a web page. Your choices are normally: square, thumbnail, small, medium, or large. You may also see "Original Size," but that may be only when using a pro account.
- At the bottom, you'll see two choices. You can either copy the photos URL (Universal Resource Locator), which is what you'd send if you want to email the shot, or the HTML you need to copy to put the photo on a web page.

If you posting a few pictures into a blogger post, for example, you'd go to your Blogger Dashboard, click on your blog, then "Create Post", then on "Edit HTML" and paste in the code. Click on Compose or Preview and you'll see your picture.
There's a lot more to Flickr, but this will get you started. Check out the Help section on Flickr, which is well organized, and read through it.
Technorati Tags: Howto, Blogging, Flickr, Family,

